Ockam Routing

Nazmul Idris
Published 2023-07-31


Ockam is a suite of programming libraries, command line tools, and managed cloud services to orchestrate end-to-end encryption, mutual authentication, key management, credential management, and authorization policy enforcement — all at massive scale. Ockam's end-to-end secure channels guarantee authenticity, integrity, and confidentiality of all data-in-motion at the application layer.
One of the key features that makes this possible is Ockam Routing. Routing allows us to create secure channels over multi-hop, multi-protocol routes which can span various network topologies (servers behind NAT firewalls with no external ports open, etc) and transport protocols (TCP, UDP, WebSockets, BLE, etc).
In this blog post we will explore the Ockam Rust Library and see how routing works in Ockam. We will work with Rust code and look at some code examples that demonstrate the simple case, and more advanced use cases.
Mitigating risk
Before we get started, let's quickly discuss the pitfalls of using existing approaches to securing communications within applications. Security is not something that most of us think about when we are building systems and are focused on getting things working and shipping.
Traditional secure communication implementations are typically tightly coupled with transport protocols in a way that all their security is limited to the length and duration of one underlying transport connection.
- For example, most TLS implementations are tightly coupled with the underlying TCP connection. If your application's data and requests travel over two TCP connection hops (TCP → TCP), then all TLS guarantees break at the bridge between the two networks. This bridge, gateway, or load balancer then becomes a point of weakness for application data.
- Traditional secure communication protocols are also unable to protect your application's data if it travels over multiple different transport protocols. They can't guarantee data authenticity or data integrity if your application's communication path is UDP → TCP or BLE → TCP.
In other words using traditional secure communication implementations you may be opening the doors to losing trust in the data that your apps are working on. Here are some aspects of your apps that may be at risk:
- Lack of trust in the data your app receives.
- Who sent it to my app?
- Is it actually the data they sent my app?
- Missing authentication, data integrity.
- Lack of trust in the data your app sends.
- Who am I sending the data to?
- Would someone else, other than them, be able to see it?
Our journey
In this blog post we will create two examples of Ockam nodes communicating with each other using Ockam Routing and Ockam Transports. We will use the Rust library to create these Ockam nodes and setup routing. Ockam Routing and transports enable other Ockam protocols to provide end-to-end guarantees like trust, security, privacy, reliable delivery, and ordering at the application layer.
- Ockam Routing: is a simple and lightweight message-based protocol that makes it possible to bidirectionally exchange messages over a large variety of communication topologies: TCP -> TCP or TCP -> TCP -> TCP or BLE -> UDP -> TCP or BLE -> TCP -> TCP or TCP -> Kafka -> TCP or any other topology you can imagine.
- Ockam Transports: adapt Ockam Routing to various transport protocols.
An Ockam node is any running application that can communicate with other applications using various Ockam protocols like Routing, Relays, and Portals, Secure Channels, etc.
An Ockam node can be defined as any independent process which provides an API supporting
the Ockam Routing protocol. We can create Ockam nodes using the
Ockam command line interface (CLI) (ockam command)
or using various Ockam programming libraries like our Rust and Elixir libraries. We will
be using the Rust library in this blog post.
Let's dive in
To get started please follow this guide to get the Rust toolchain setup on your machine along with an empty project.
- The empty project is named
hello_ockam. - This will be the starting point for all our examples in this blog post.
Simple example
For our first example, we will create a simple Ockam node that will send a message over some hops (in the same node) to a worker (in the same node) that just echoes the message back. There are no TCP transports involved and all the messages are being passed back and forth inside the same node. This will give us a feel for building workers and routing at a basic level.
When a worker is started on a node, it is given one or more addresses. The node maintains a mailbox for each address and whenever a message arrives for a specific address it delivers that message to the corresponding registered worker.
For more information on creating nodes and workers using the Rust library, please refer to this guide.
We will need to create a Rust source file with a main() program, and two other Rust
source files with two workers: Hopper and Echoer. We can then send a string message
and see if we can get it echoed back.
Before we begin let's consider routing. When we send a message inside of a node it
carries with it 2 metadata fields, onward_route and return_route, where a route is
simply a list of addresses. Each worker gets an address in a node.
So, if we wanted to send a message from the app address to the echoer address, with 3
hops in the middle, we can build a route like the following.
_16┌───────────────────────┐_16│ Node 1 │_16├───────────────────────┤_16│ ┌────────────────┐ │_16│ │ Address: │ │_16│ │ 'app' │ │_16│ └─┬────────────▲─┘ │_16│ ┌─▼────────────┴─┐ │_16│ │ Address: │ │_16│ │ 'hopper1..3' │x3 │_16│ └─┬────────────▲─┘ │_16│ ┌─▼────────────┴─┐ │_16│ │ Address: │ │_16│ │ 'echoer' │ │_16│ └────────────────┘ │_16└───────────────────────┘
Here's the Rust code to build this route.
_10/// Send a message to the echoer worker via the "hopper1", "hopper2", and "hopper3" workers._10let route = route!["hopper1", "hopper2", "hopper3", "echoer"];
Let's add some source code to make this happen next. The first thing we will do is add one
more dependency to this empty hello_ockam project. The
colored crate
will give us colorized console output which will make the output from our examples so much
easier to read and understand.
_10cargo add colored
Then we add the echoer worker (in our hello_ockam project) by creating a new
/src/echoer.rs file and copy / pasting the following code in it.
_37use colored::Colorize;_37use ockam::{Context, Result, Routed, Worker};_37_37pub struct Echoer;_37_37/// When a worker is started on a node, it is given one or more addresses. The node_37/// maintains a mailbox for each address and whenever a message arrives for a specific_37/// address it delivers that message to the corresponding registered worker._37///_37/// Workers can handle messages from other workers running on the same or a different_37/// node. In response to a message, an worker can: make local decisions, change its_37/// internal state, create more workers, or send more messages to other workers running on_37/// the same or a different node._37#[ockam::worker]_37impl Worker for Echoer {_37 type Context = Context;_37 type Message = String;_37_37 async fn handle_message(&mut self, ctx: &mut Context, msg: Routed<String>) -> Result<()> {_37 // Echo the message body back on its return_route._37 let addr_str = ctx.address().to_string();_37 let msg_str = msg.as_body().to_string();_37 let new_msg_str = format!("👈 echo back: {}", msg);_37_37 // Formatting stdout output._37 let lines = [_37 format!("📣 'echoer' worker → Address: {}", addr_str.bright_yellow()),_37 format!(" Received: '{}'", msg_str.green()),_37 format!(" Sent: '{}'", new_msg_str.cyan()),_37 ];_37 lines_37 .iter()_37 .for_each(|line| println!("{}", line.white().on_black()));_37_37 ctx.send(msg.return_route(), new_msg_str).await_37 }_37}
Next we add the hopper worker (in our hello_ockam project) by creating a new
/src/hopper.rs file and copy / pasting the following code in it.
Note how this worker manipulates the onward_route & return_route fields of the message
to send it to the next hop. We will actually see this in the console output when we run
this code soon.
_52use colored::Colorize;_52use ockam::{Any, Context, Result, Routed, Worker};_52_52pub struct Hopper;_52_52#[ockam::worker]_52impl Worker for Hopper {_52 type Context = Context;_52 type Message = Any;_52_52 /// This handle function takes any incoming message and forwards. it to the next hop_52 /// in it's onward route._52 async fn handle_message(&mut self, ctx: &mut Context, msg: Routed<Any>) -> Result<()> {_52 // Cast the msg to a Routed<String>_52 let msg: Routed<String> = msg.cast()?;_52_52 let msg_str = msg.to_string().white().on_bright_black();_52 let addr_str = ctx.address().to_string().white().on_bright_black();_52_52 // Some type conversion._52 let mut message = msg.into_local_message();_52 let transport_message = message.transport_mut();_52_52 // Remove my address from the onward_route._52 let removed_address = transport_message.onward_route.step()?;_52 let removed_addr_str = removed_address_52 .to_string()_52 .white()_52 .on_bright_black()_52 .strikethrough();_52_52 // Formatting stdout output._52 let lines = [_52 format!("🐇 'hopper' worker → Addr: '{}'", addr_str),_52 format!(" Received: '{}'", msg_str),_52 format!(" onward_route -> remove: '{}'", removed_addr_str),_52 format!(" return_route -> prepend: '{}'", addr_str),_52 ];_52 lines_52 .iter()_52 .for_each(|line| println!("{}", line.black().on_yellow()));_52_52 // Insert my address at the beginning return_route._52 transport_message_52 .return_route_52 .modify()_52 .prepend(ctx.address());_52_52 // Send the message on its onward_route._52 ctx.forward(message).await_52 }_52}
And finally let's add a main() to our hello_ockam project. This will be the entry
point for our example.
When a new node starts and calls an async main function, it turns that function into a
worker with an address of app. This makes it easy to send and receive messages from the
main function (i.e the app worker).
Create an empty file /examples/03-routing-many.hops.rs (note this is in the examples/
folder and not src/ folder like the workers above).
_75use colored::Colorize;_75use hello_ockam::{Echoer, Hopper};_75use ockam::{node, route, Context, Result};_75_75#[rustfmt::skip]_75const HELP_TEXT: &str =r#"_75┌───────────────────────┐_75│ Node 1 │_75├───────────────────────┤_75│ ┌────────────────┐ │_75│ │ Address: │ │_75│ │ 'app' │ │_75│ └─┬────────────▲─┘ │_75│ ┌─▼────────────┴─┐ │_75│ │ Address: │ │_75│ │ 'hopper1..3' │x3 │_75│ └─┬────────────▲─┘ │_75│ ┌─▼────────────┴─┐ │_75│ │ Address: │ │_75│ │ 'echoer' │ │_75│ └────────────────┘ │_75└───────────────────────┘_75"#;_75_75/// This node routes a message through many hops._75#[ockam::node]_75async fn main(ctx: Context) -> Result<()> {_75 println!("{}", HELP_TEXT.green());_75_75 print_title(vec![_75 "Run a node w/ 'app', 'echoer' and 'hopper1', 'hopper2', 'hopper3' workers",_75 "then send a message over 3 hops",_75 "finally stop the node",_75 ]);_75_75 // Create a node with default implementations._75 let mut node = node(ctx);_75_75 // Start an Echoer worker at address "echoer"._75 node.start_worker("echoer", Echoer).await?;_75_75 // Start 3 hop workers at addresses "hopper1", "hopper2" and "hopper3"._75 node.start_worker("hopper1", Hopper).await?;_75 node.start_worker("hopper2", Hopper).await?;_75 node.start_worker("hopper3", Hopper).await?;_75_75 // Send a message to the echoer worker via the "hopper1", "hopper2", and "hopper3" workers._75 let route = route!["hopper1", "hopper2", "hopper3", "echoer"];_75 let route_msg = format!("{:?}", route);_75 let msg = "Hello Ockam!";_75 node.send(route, msg.to_string()).await?;_75_75 // Wait to receive a reply and print it._75 let reply = node.receive::<String>().await?;_75_75 // Formatting stdout output._75 let lines = [_75 "🏃 Node 1 →".to_string(),_75 format!(" sending: {}", msg.green()),_75 format!(" over route: {}", route_msg.blue()),_75 format!(" and receiving: '{}'", reply.purple()), // Should print "👈 echo back: Hello Ockam!"_75 format!(" then {}", "stopping".bold().red()),_75 ];_75 lines_75 .iter()_75 .for_each(|line| println!("{}", line.black().on_white()));_75_75 // Stop all workers, stop the node, cleanup and return._75 node.stop().await_75}_75_75fn print_title(title: Vec<&str>) {_75 let line = format!("🚀 {}", title.join("\n → ").white());_75 println!("{}", line.black().on_bright_black())_75}
Now it is time to run our program to see what it does! 🎉
In your terminal app, run the following command. Note that OCKAM_LOG=none is used to
disable logging output from the Ockam library. This is done to make the output of the
example easier to read.
_10OCKAM_LOG=none cargo run --example 03-routing-many-hops
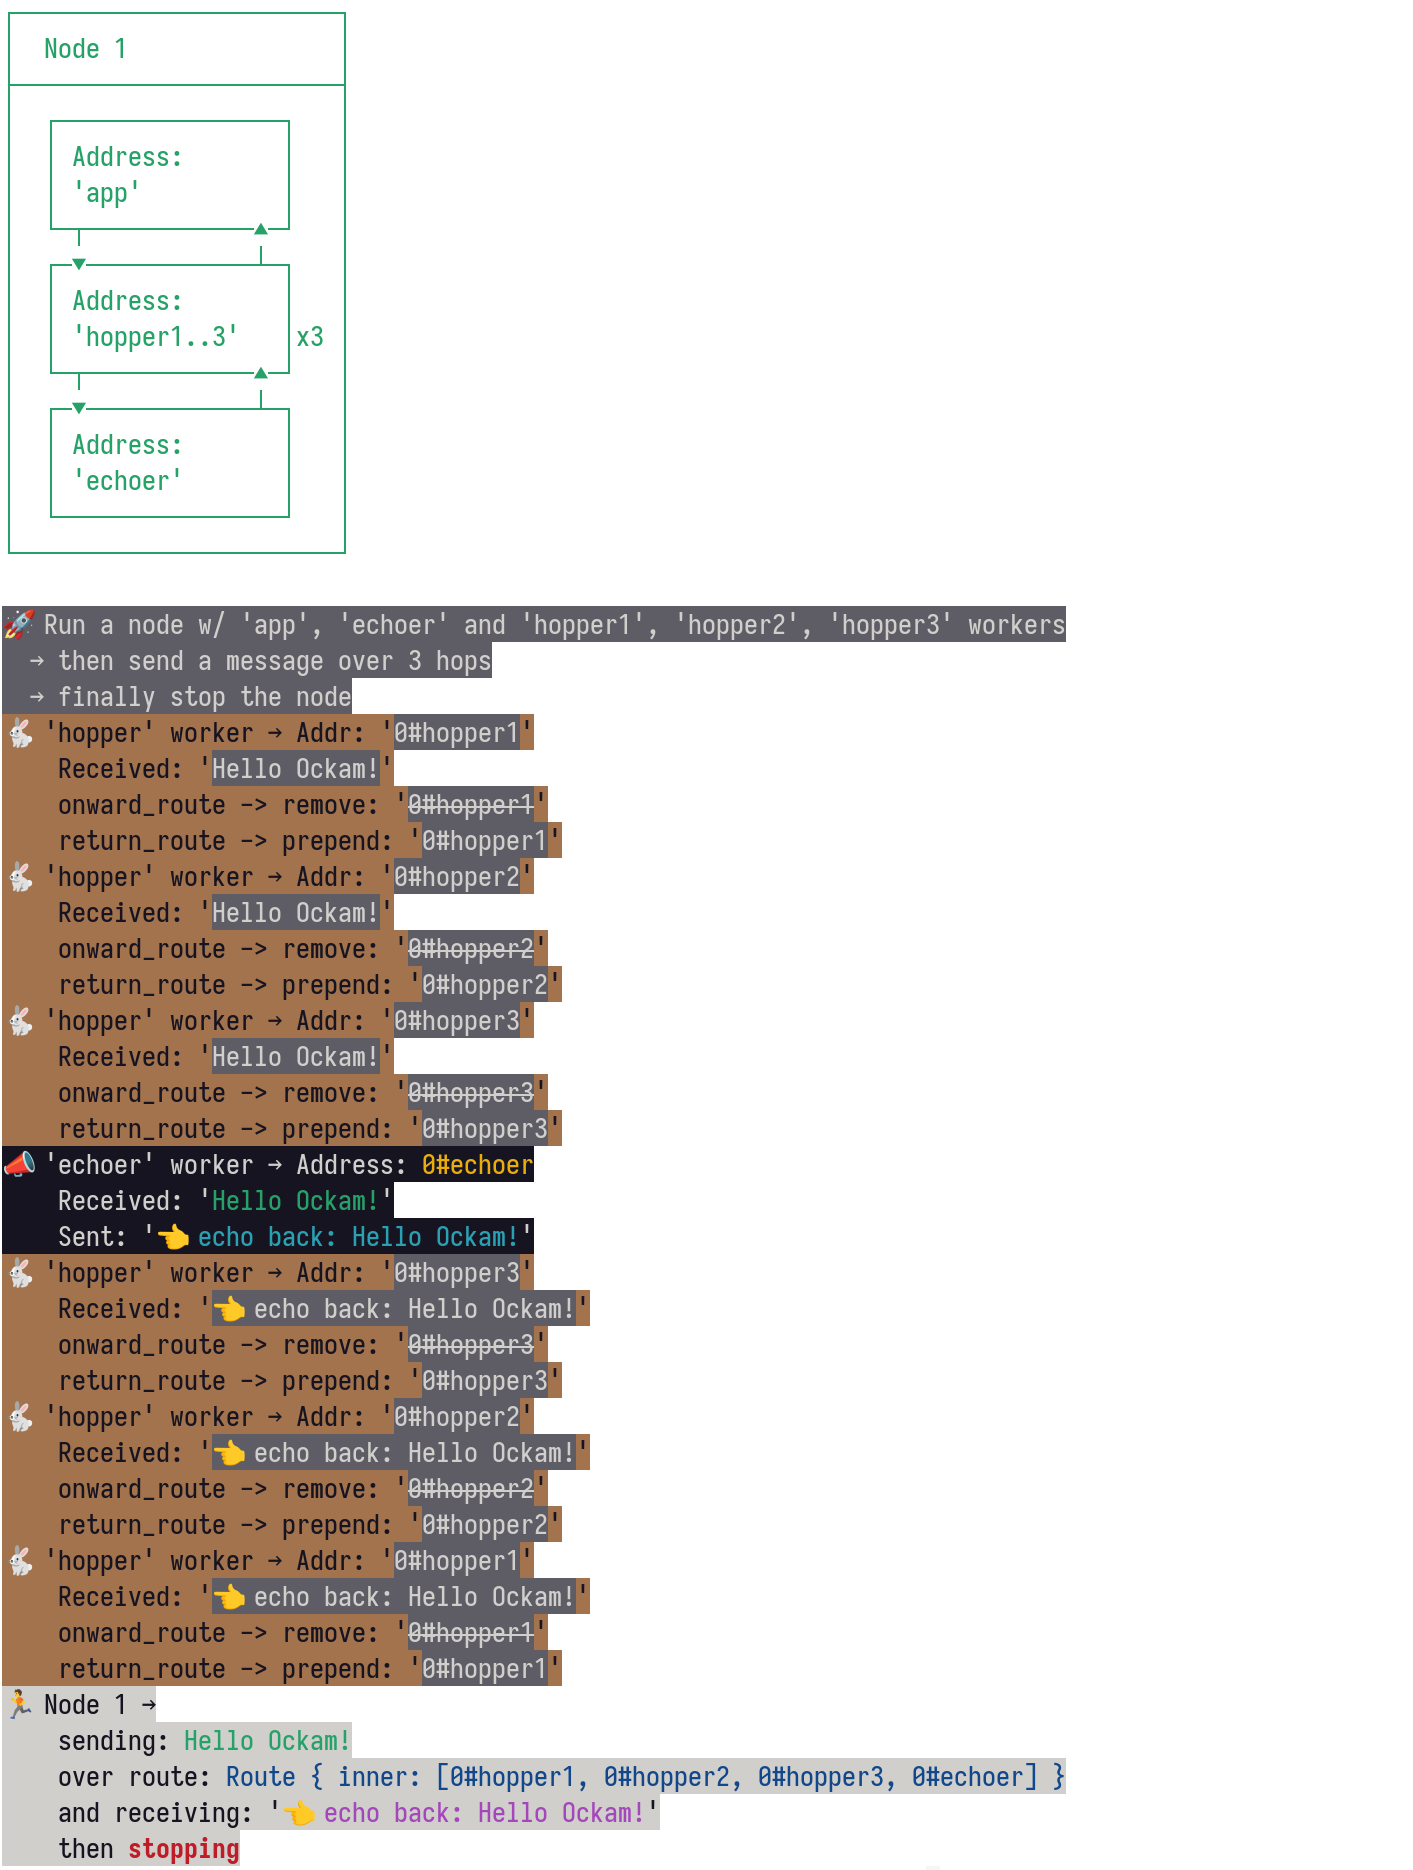
And you should see something like the following. Our example program creates multiple hop
workers (three hopper workers) between the app and the echoer and route our message
through them 🚀.
Complex example
This example continues from the simple example above, we are going to reuse all the dependencies and workers in this example so please make sure to complete the simple example before working on this one.
In this example, we will introduce TCP transports in between the hops. Instead of passing messages around between workers in the same node, we will spawn multiple nodes. Then we will have a few TCP transports (TCP socket client and listener combos) that will connect the nodes.
An Ockam transport is a plugin for Ockam Routing. It moves Ockam Routing messages using a specific transport protocol like TCP, UDP, WebSockets, Bluetooth, etc.
We will have three nodes:
node_initiator: The first node initiates sending the message over TCP to the middle node (port3000).node_middle: Then middle node simply forwards this message on to the last node over TCP again (port4000this time).node_responder: And finally the responder node receives the message and sends a reply back to the initiator node.
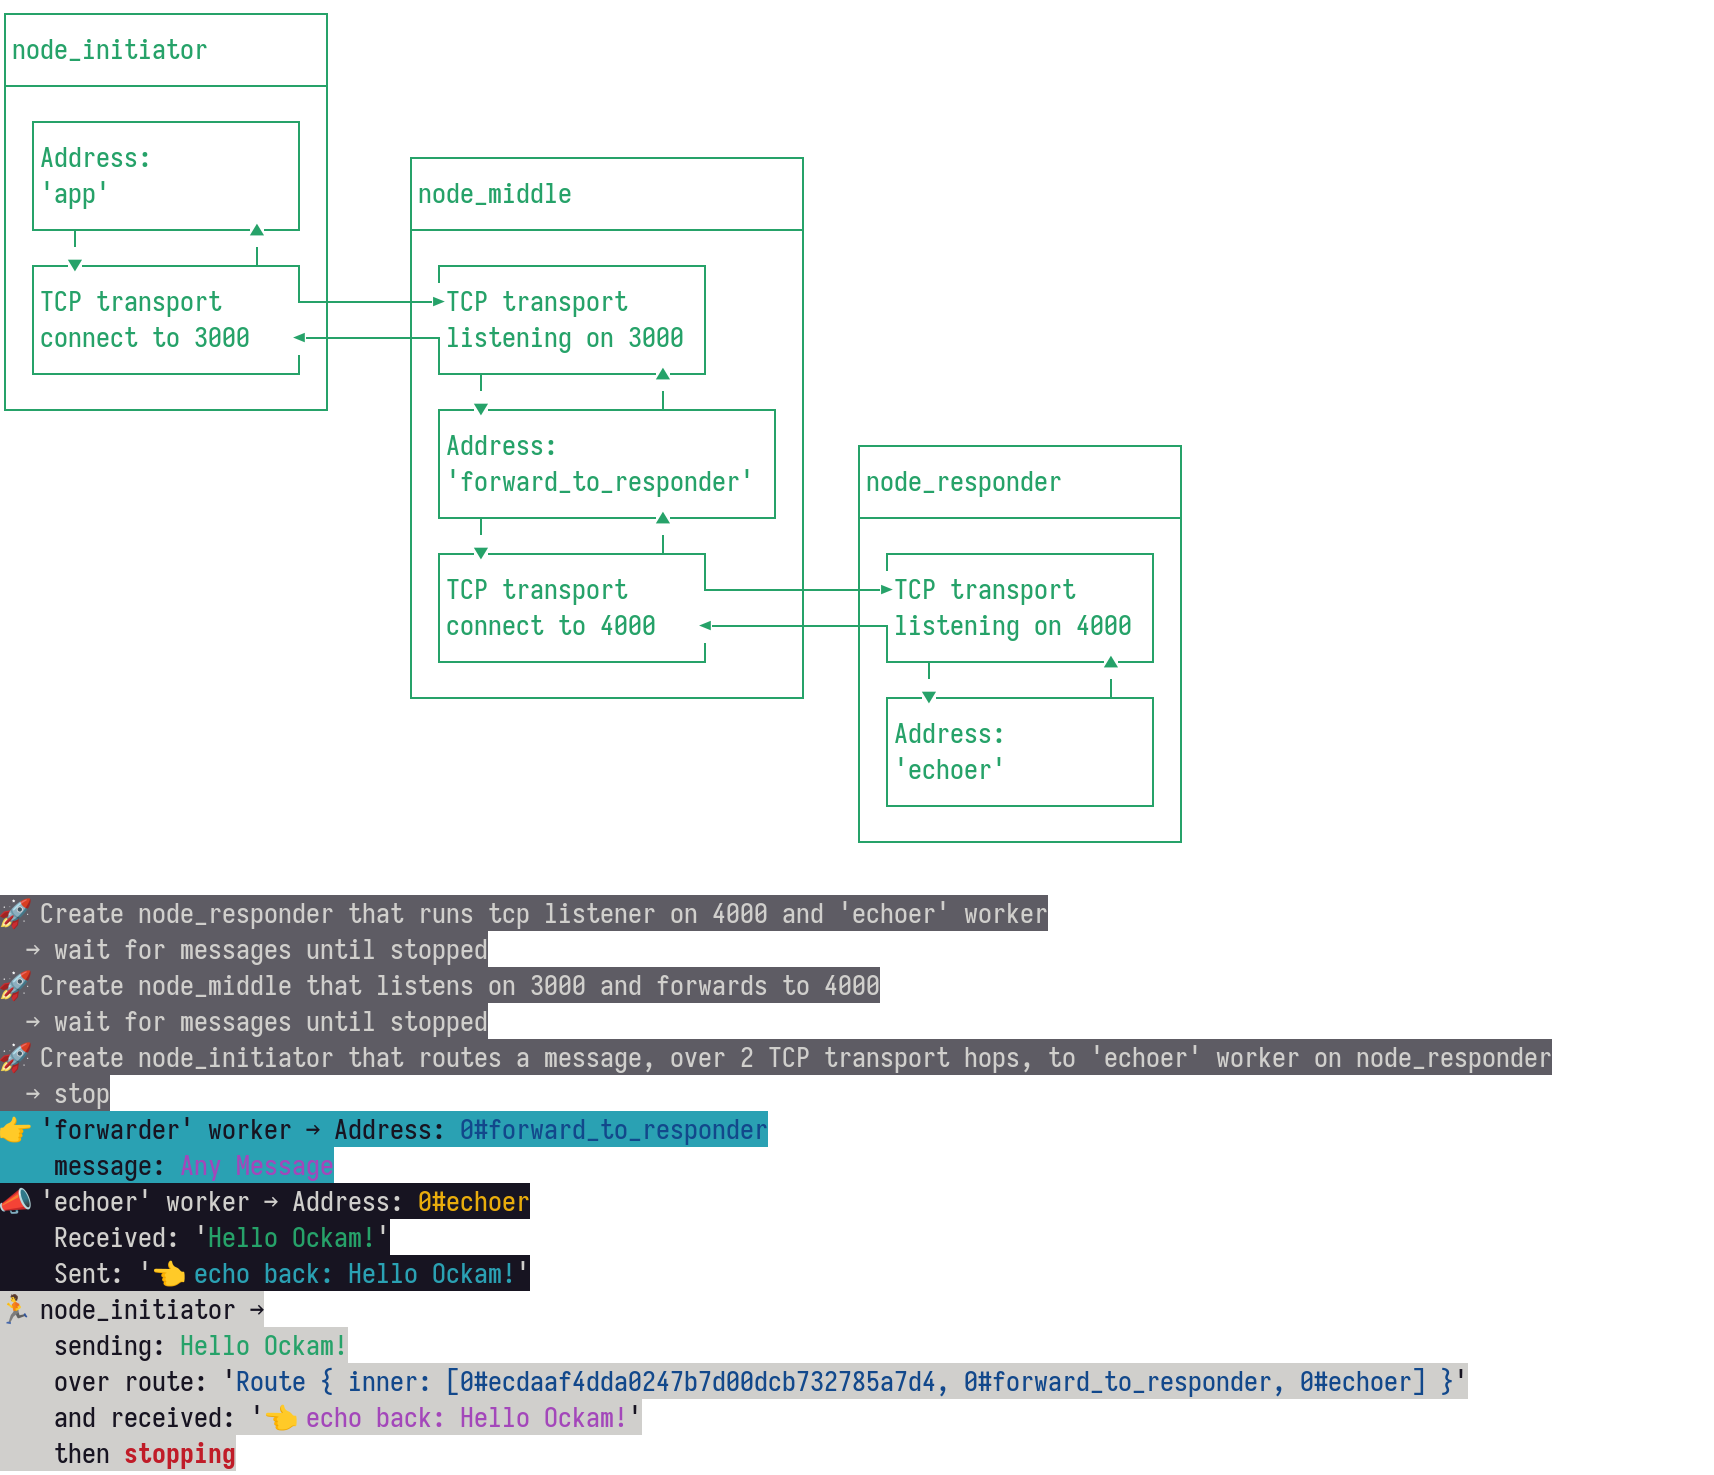
The following diagram depicts what we will build next. In this example all these nodes are on the same machine, but they can easy just be nodes on different machines.
_24┌──────────────────────┐_24│node_initiator │_24├──────────────────────┤_24│ ┌──────────────────┐ │_24│ │Address: │ │ ┌───────────────────────────┐_24│ │'app' │ │ │node_middle │_24│ └──┬────────────▲──┘ │ ├───────────────────────────┤_24│ ┌──▼────────────┴──┐ │ │ ┌──────────────────┐ │_24│ │TCP transport └─┼─────┼─►TCP transport │ │_24│ │connect to 3000 ◄─┼─────┼─┐listening on 3000 │ │_24│ └──────────────────┘ │ │ └──┬────────────▲──┘ │_24└──────────────────────┘ │ ┌──▼────────────┴───────┐ │_24 │ │Address: │ │ ┌──────────────────────┐_24 │ │'forward_to_responder' │ │ │node_responder │_24 │ └──┬────────────▲───────┘ │ ├──────────────────────┤_24 │ ┌──▼────────────┴──┐ │ │ ┌──────────────────┐ │_24 │ │TCP transport └──────┼───┼─►TCP transport │ │_24 │ │connect to 4000 ◄──────┼───┼─┐listening on 4000 │ │_24 │ └──────────────────┘ │ │ └──┬────────────▲──┘ │_24 └───────────────────────────┘ │ ┌──▼────────────┴──┐ │_24 │ │Address: │ │_24 │ │'echoer' │ │_24 │ └──────────────────┘ │_24 └──────────────────────┘
Let's start by creating a new file /examples/04-routing-over-two-transport-hops.rs (in
the /examples/ folder and not /src/ folder). Then copy / paste the following code in
that file.
_63use colored::Colorize;_63use hello_ockam::{Echoer, Forwarder};_63use ockam::{_63 node, route, AsyncTryClone, Context, Result, TcpConnectionOptions, TcpListenerOptions,_63 TcpTransportExtension,_63};_63_63#[rustfmt::skip]_63const HELP_TEXT: &str =r#"_63┌──────────────────────┐_63│node_initiator │_63├──────────────────────┤_63│ ┌──────────────────┐ │_63│ │Address: │ │ ┌───────────────────────────┐_63│ │'app' │ │ │node_middle │_63│ └──┬────────────▲──┘ │ ├───────────────────────────┤_63│ ┌──▼────────────┴──┐ │ │ ┌──────────────────┐ │_63│ │TCP transport └─┼─────┼─►TCP transport │ │_63│ │connect to 3000 ◄─┼─────┼─┐listening on 3000 │ │_63│ └──────────────────┘ │ │ └──┬────────────▲──┘ │_63└──────────────────────┘ │ ┌──▼────────────┴───────┐ │_63 │ │Address: │ │ ┌──────────────────────┐_63 │ │'forward_to_responder' │ │ │node_responder │_63 │ └──┬────────────▲───────┘ │ ├──────────────────────┤_63 │ ┌──▼────────────┴──┐ │ │ ┌──────────────────┐ │_63 │ │TCP transport └──────┼───┼─►TCP transport │ │_63 │ │connect to 4000 ◄──────┼───┼─┐listening on 4000 │ │_63 │ └──────────────────┘ │ │ └──┬────────────▲──┘ │_63 └───────────────────────────┘ │ ┌──▼────────────┴──┐ │_63 │ │Address: │ │_63 │ │'echoer' │ │_63 │ └──────────────────┘ │_63 └──────────────────────┘_63"#;_63_63#[ockam::node]_63async fn main(ctx: Context) -> Result<()> {_63 println!("{}", HELP_TEXT.green());_63_63 let ctx_clone = ctx.async_try_clone().await?;_63 let ctx_clone_2 = ctx.async_try_clone().await?;_63_63 let mut node_responder = create_responder_node(ctx).await.unwrap();_63_63 let mut node_middle = create_middle_node(ctx_clone).await.unwrap();_63_63 create_initiator_node(ctx_clone_2).await.unwrap();_63_63 node_responder.stop().await.ok();_63 node_middle.stop().await.ok();_63_63 println!(_63 "{}",_63 "App finished, stopping node_responder & node_middle".red()_63 );_63_63 Ok(())_63}_63_63fn print_title(title: Vec<&str>) {_63 let line = format!("🚀 {}", title.join("\n → ").white());_63 println!("{}", line.black().on_bright_black())_63}
This code won't actually compile, since there are 3 functions missing from this source file. We are just adding this file first in order to stage the rest of the code we will write next.
This main() function creates the three nodes like we see in the diagram above, and it
also stops them after the example is done running.
Initiator node
So let's write the function that creates the initiator node first. Copy the following into
the source file we created earlier (/examples/04-routing-over-two-transport-hops.rs),
and paste it below the existing code there:
_43/// This node routes a message, to a worker on a different node, over two TCP transport_43/// hops._43async fn create_initiator_node(ctx: Context) -> Result<()> {_43 print_title(vec![_43 "Create node_initiator that routes a message, over 2 TCP transport hops, to 'echoer' worker on node_responder",_43 "stop",_43 ]);_43_43 // Create a node with default implementations._43 let mut node = node(ctx);_43_43 // Initialize the TCP transport._43 let tcp_transport = node.create_tcp_transport().await?;_43_43 // Create a TCP connection to the middle node._43 let connection_to_middle_node = tcp_transport_43 .connect("localhost:3000", TcpConnectionOptions::new())_43 .await?;_43_43 // Send a message to the "echoer" worker, on a different node, over two TCP hops. Wait_43 // to receive a reply and print it._43 let route = route![connection_to_middle_node, "forward_to_responder", "echoer"];_43 let route_str = format!("{:?}", route);_43 let msg = "Hello Ockam!";_43 let reply = node_43 .send_and_receive::<String>(route, msg.to_string())_43 .await?;_43_43 // Formatting stdout output._43 let lines = [_43 "🏃 node_initiator →".to_string(),_43 format!(" sending: {}", msg.green()),_43 format!(" over route: '{}'", route_str.blue()),_43 format!(" and received: '{}'", reply.purple()), // Should print "👈 echo back: Hello Ockam!"_43 format!(" then {}", "stopping".bold().red()),_43 ];_43 lines_43 .iter()_43 .for_each(|line| println!("{}", line.black().on_white()));_43_43 // Stop all workers, stop the node, cleanup and return._43 node.stop().await_43}
This (initiator) node will send a message to the responder using the following route.
_10let route = route![connection_to_middle_node, "forward_to_responder", "echoer"];
Note the use of a mix of TCP transport routes as well as addresses for other workers.
Also note that this node does not have to be aware of the full topology of the network of
nodes. It just knows that it has to jump over the TCP transport
connection_to_middle_node and then have its message routed to forward_to_responder
address followed by echoer address.
Middle node
Let's create the middle node next, which will run the worker Forwarder on this address:
forward_to_responder.
Copy and paste the following into the source file we created above
(/examples/04-routing-over-two-transport-hops.rs).
- This middle node simply forwards whatever comes into its TCP listener (on
3000) to port4000. - This node has a
Forwarderworker on addressforward_to_responder, so that's how the initiator can reach this address specified in its route at the start of this example.
_42/// - Starts a TCP listener at 127.0.0.1:3000._42/// - This node creates a TCP connection to a node at 127.0.0.1:4000._42/// - Starts a forwarder worker to forward messages to 127.0.0.1:4000._42/// - Then runs forever waiting to route messages._42async fn create_middle_node(ctx: Context) -> Result<ockam::Node> {_42 print_title(vec![_42 "Create node_middle that listens on 3000 and forwards to 4000",_42 "wait for messages until stopped",_42 ]);_42_42 // Create a node with default implementations._42 let node = node(ctx);_42_42 // Initialize the TCP transport._42 let tcp_transport = node.create_tcp_transport().await?;_42_42 // Create a TCP connection to the responder node._42 let connection_to_responder = tcp_transport_42 .connect("127.0.0.1:4000", TcpConnectionOptions::new())_42 .await?;_42_42 // Create a Forwarder worker._42 node.start_worker(_42 "forward_to_responder",_42 Forwarder {_42 address: connection_to_responder.into(),_42 },_42 )_42 .await?;_42_42 // Create a TCP listener and wait for incoming connections._42 let listener = tcp_transport_42 .listen("127.0.0.1:3000", TcpListenerOptions::new())_42 .await?;_42_42 // Allow access to the Forwarder via TCP connections from the TCP listener._42 node.flow_controls()_42 .add_consumer("forward_to_responder", listener.flow_control_id());_42_42 // Don't call node.stop() here so this node runs forever._42 Ok(node)_42}
We will also need the Forwarder worker that we use in the middle node. Copy and paste
the following into a new source file /src/forwarder.rs. This file goes in the src
folder and not the examples folder.
_61use colored::Colorize;_61use ockam::{Address, Any, Context, LocalMessage, Result, Routed, Worker};_61_61pub struct Forwarder {_61 pub address: Address,_61}_61_61#[ockam::worker]_61impl Worker for Forwarder {_61 type Context = Context;_61 type Message = Any;_61_61 /// This handle function takes any incoming message and forwards it to the next hop in_61 /// it's onward route._61 async fn handle_message(&mut self, ctx: &mut Context, msg: Routed<Any>) -> Result<()> {_61 let address_str = ctx.address().to_string();_61 let msg_str = msg.to_string();_61_61 // Formatting stdout output._61 let lines = [_61 format!("👉 'forwarder' worker → Address: {}", address_str.blue()),_61 format!(" message: {}", msg_str.purple()),_61 ];_61 lines_61 .iter()_61 .for_each(|line| println!("{}", line.black().on_cyan()));_61_61 // Do some type conversion._61 let mut transport_message = msg.into_local_message().into_transport_message();_61_61 transport_message_61 .onward_route_61 .modify()_61 .pop_front() // Remove my address from the onward_route._61 .prepend(self.address.clone()); // Prepend predefined address to the onward_route._61_61 let prev_hop = transport_message.return_route.next()?.clone();_61_61 // Wipe all local info (e.g. transport types)._61 let message = LocalMessage::new(transport_message, vec![]);_61_61 if let Some(info) = ctx_61 .flow_controls()_61 .find_flow_control_with_producer_address(&self.address)_61 {_61 ctx.flow_controls()_61 .add_consumer(prev_hop.clone(), info.flow_control_id());_61 }_61_61 if let Some(info) = ctx_61 .flow_controls()_61 .find_flow_control_with_producer_address(&prev_hop)_61 {_61 ctx.flow_controls()_61 .add_consumer(self.address.clone(), info.flow_control_id());_61 }_61_61 // Send the message on its onward_route._61 ctx.forward(message).await_61 }_61}
Responder node
Finally, we will create the responder node. This node will run the worker echoer which
actually echoes the message back to the initiator. Copy and paste the following into the
source file above (/examples/04-routing-over-two-transport-hops.rs).
- This node has an
Echoerworker on addressechoer, so that's how the initiator can reach this address specified in its route at the start of this example.
_28/// This node starts a TCP listener and an echoer worker. It then runs forever waiting for_28/// messages._28async fn create_responder_node(ctx: Context) -> Result<ockam::Node> {_28 print_title(vec![_28 "Create node_responder that runs tcp listener on 4000 and 'echoer' worker",_28 "wait for messages until stopped",_28 ]);_28_28 // Create a node with default implementations._28 let node = node(ctx);_28_28 // Initialize the TCP transport._28 let tcp_transport = node.create_tcp_transport().await?;_28_28 // Create an echoer worker._28 node.start_worker("echoer", Echoer).await?;_28_28 // Create a TCP listener and wait for incoming connections._28 let listener = tcp_transport_28 .listen("127.0.0.1:4000", TcpListenerOptions::new())_28 .await?;_28_28 // Allow access to the Echoer via TCP connections from the TCP listener._28 node.flow_controls()_28 .add_consumer("echoer", listener.flow_control_id());_28_28 Ok(node)_28}
Let's run this example to see what it does 🎉.
In your terminal app, run the following command. Note that OCKAM_LOG=none is used to
disable logging output from the Ockam library. This is done to make the output of the
example easier to read.
_10cargo run --example 04-routing-over-two-transport-hops
This should produce output similar to the following. Our example program creates a route
that traverses multiple nodes and TCP transports from the app to the echoer and routes
our message through them 🚀.
Next steps
Ockam Routing and transports are extremely powerful and flexible. They are one of the key features that enables Ockam Secure Channels to be implemented. By layering Ockam Secure Channels and other protocols over Ockam Routing, we can provide end-to-end guarantees over arbitrary transport topologies that span many networks and clouds.
In a future blog post we will be covering Ockam Secure Channels and how they can be used to provide end-to-end guarantees over arbitrary transport topologies. So stay tuned!
In the meantime here are some good jumping off points to learn more about Ockam:
- Deep dive into Ockam Routing.
- Install Ockam command line interface (CLI)
(
ockamcommand) on your computer and try to create end-to-end encrypted communication between two apps. That will give you a taste of the experience of using Ockam on the command line in addition to our Rust library.
Previous Article
Authenticate & authorize every access decision
Next Article
Rewriting Ockam in Rust